Sync Rules in Depth
Below is a comprehensive list of the different parts and options in a sync rule in Binfer Enterprise Sync. Any option that has a red asterisk (*) is required to create a sync rule.
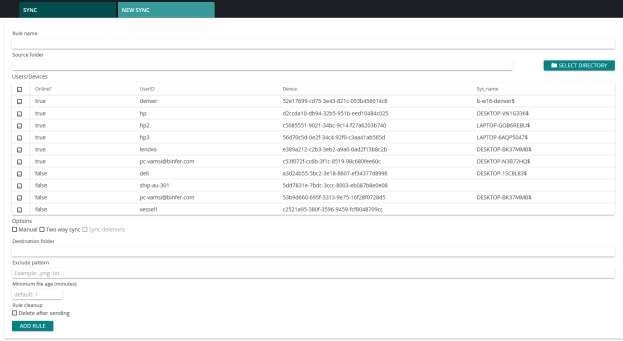
Rule Name*: A name that uniquely identifies the rule. We recommend creating an internal naming system, which will make managing hundreds of rules far easier.
Source Folder*: The complete path of the folder that is to be synced. The “Select Directory” button to the right will allow the user to more easily browse and select the folder you wish to sync from the file explorer on the device.
Users/Devices*: This menu shows a list of all PC instances that are currently set up and available for you to sync your Source Folder with.
Select one or more clients with whom you want to create the sync rule.
Options
Manual: Selecting this option means that once you have added the rule, to run the rule the user must select the rule in the Sync tab and press the Execute button for files to be synced across devices. When this feature is not enabled, a universal rule will check every X minutes.
Tip: You can adjust the rule check time by typing any number of minutes you’d like at the top of Sync tab in the ‘Check for changes every X minutes’ option and clicking the Save button immediately next to the field.
Two-way sync: Enables two-way Sync between devices. This means that if files are changed in the synced folder on any device in the rule, those changes will sync to all devices.
Sync Deletions: When selected, all files deleted from the synced folder by any member will be deleted across all devices on the sync rule.
NOTE: When a file is deleted on one side of the sync rule and there has been an edit on another device since the last sync cycle, the delete will override the edit.
Destination folder: This is the folder location where the sender’s file will be stored on the recipient’s device. Binfer on the recipient’s end must have permissions to write to this folder. If no destination folder is selected or the selected destination folder does not exist, files will be downloaded to the default destination folder on the recipient’s device.
Include Pattern: Provide a regular expression if you want to include specific files/folders from sync source folder. Example: .doc|.docx|.pdf will exclude all word documents and PDFs from syncing across. For more examples and further information on Regex patterns, see our Example Regex Patterns section at the bottom of this page.
Exclude Pattern: Provide a regular expression if you want to exclude specific files/folders from sync source folder. Example: .doc|.docx|.pdf will exclude all word documents and PDFs from syncing across. For more examples and further information on Regex patterns, see our Example Regex Patterns section at the bottom of this page.
Minimum File Age: This setting allows you to prevent a file from syncing for a set amount of time after being modified. The default is 1 minute. As an example, if you are editing a document and step out for 5 minutes, you may not want the updates to sync. In this situation, you would want to set a ‘Minimum File Age’ of greater than 5 minutes.
Cleanup: This option is not advisable when ‘Two way sync’ is selected.
When ‘Delete After Sending’ is checked, all sent files will be deleted from the source folder after syncing.
When ‘Delete after sending’ is selected, ‘Backup Before Deleting’ will also appear as an option. This option allows you to specify a Backup Location path to save files before deleting.
Schedule: When ‘Run this rule on a specific schedule’ is checked, a grid appears for you to set the scheduled times the rule can run based on what days you check and hours you set. The rule will only execute during the given hours set.
Please note that to set a schedule you must first check the days you wish the rule to run, then set the acceptable hour range during those days. If you set the hours but do not check a given day, the rule will not run during that day.
Script job command: This rule allows you to provide a relative path to a script inside the synced folder that will be executed after the entire folder is synced.
Adding the Rule
Before clicking ‘ADD RULE’, review all sync rule details to ensure accuracy. Once ‘ADD RULE’ is clicked, a new rule will be created and added to the rule list in your ‘Sync’ tab. Your sync rule can then be viewed and managed within the ‘Sync’ tab.
Note:
- Only Users/Devices and a few other options can be changed after a rule is created.
- Two rules cannot have the same source folder. Instead, devices must be added to existing rule.
Example Regex Patterns
Example 1: vessel001
This simple pattern will match with all files that include vessel001 in their file name (For example, all of these will match: vessel001-wages.txt or dataio-vessel001.bin or new-vessel001-prod.txt)
Example 2: (.txt)$
This pattern will match the all files with the .txt file extensions which are just text files. ($ indicates look at the end of the file name. All of the following would match: file1.txt, data.txt, important-readme.txt)
Example 3: (.xlsx|.docx|.pub)$
This pattern will match files with xlsx, docx, or pub file extensions. This is a simple expression to match office document formats. Feel free to add more with the separator | . For example, if you want to add pdf files just change the expression to (.xlsx|.docx|.pub|.pdf)$
Example 4: ([binfer]\w*)+(.pdf|.txt)$
This pattern will match with all files that starts with ‘binfer’ and end with the pdf or txt file extensions(\w* indicates any one or more words)
Example 5: \d*
This pattern will match with any files that have a digit in their name, for example it matches with 123.txt or vessel-date-321.bin or hvac-0001.txt
For more information on how understand and write regex patterns visit https://regex101.com/